...
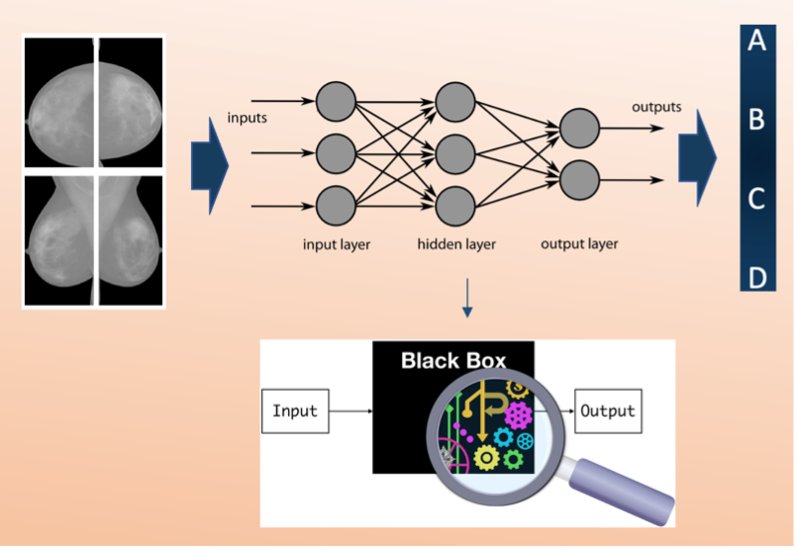
Together with high performance results, explainability is fundamental to assess trust in the model, to make it a potential application in clinical practice.
How to execute it
This example is available on the The software package, which allows an end-to-end approach, from the building and training of the network to the obtaining and visualization of the heatmaps to explain the network, is available and fully explained in a GitHub repository: https://github.com/camillascapicchio/MLINFN-CNNBreastDensityClassifier-Explainability
...
In the folder “myproject” you can find all the useful scripts.:
1) The python scripts first script Train_ResNet.py is the script to train and test the CNN requires as hardware:
- CPUs: 2x 10 cores Intel Xeon E5-2640v4 @2.40 GHz
- RAM: 64 GB
- GPUs: 8x nVidia Tesla K80, with 2x GPUs Tesla GK210, 24 GB RAM and 2496 CUDA cores each
The . Since a good performance requires a training on at least 1000 images, the training of each network requires at least 1xGPU nVidia Tesla K80 as hardware and the training requires about 24h to be completed.
2) The second script in python Prediction_ResNet.py is to test the model.
3-4) The third and the fourth scripts Figure_merit.ipynb and ClassActivationMaps.ipynb are Jupiter notebooks, the first is to obtain the figures of merit, the second to generate the Class Activation Maps. They scripts in Jupiter notebooks can be run on Google CoLab or you can clone the GitHub repo and execute the notebook locally.
The software package is designed for a double purpose:
- since our private dataset cannot be shared, and given the difficulty in finding public medical imaging data in mammography, we share the software to encourage other users to use their own datasets. Therefore, if the user has his own training dataset and the required hardware available, the training can be run. The details of our dataset and our results can be used as a benchmark. This could be fundamental to evaluate the robustness of the model on a different dataset and check the reproducibility of the algorithms.
- the other option, if a huge dataset and the hardware are not available, is to use this software package as a tutorial in the field of Medical Physics, useful to learn how to build a CNN classifier, test it, and especially generate the activation maps to understand the reasons behind the predictions, for which a standard method is currently non-existent. In this case, the first training script can be used just to visualize how the model is built without running it. While the next scripts, from the test of the model to the maps generation (from 2 to 4), can be run by using the few examples of preprocessed mammographic images we uploaded on GitHub repository, which can be used as test images, together with some files containing the weights of a pre-trained model, to test the functioning of the software.
Annotated Description
- Train_ResNet.py: this is the first script to execute if you want to train the CNN ResNet model from scratch. You may train the network four times, one per projection. You can use your own dataset as training set. It should consist of at least about 1000 images and it should be divided in 4 different folders (CC_R, CC_L, MLO_L, MLO_R) and each folder divided into 4 sub-folders, one per class (A, B, C, D). In "CC_R_model" directory we saved the output of a training as an example.
- Prediction_ResNet.py: this is the script to test the saved trained model on new images. It is suggested to use your own test set also for testing. The test set of images should be organized in folders as the training set. If you don't have enough images to train the model but you just want to test it, you can use a pre-trained model ('weights-improvement-46-0.80.h5') saved in the folder "CC_R_model".
- Figure_merit.ipynb: this is the script to obtain the metrics, the final figures of merit to evaluate the classification performance on the test set. You need as input the .txt files, obtained with the script "Prediction_ResNet.py" and containing the prediction outcomes, as input. We uploaded "predictions_mlor.txt, predictions_ccr.txt, predictions_mlol.txt, predictions_ccl.txt" files in folder "Prediction", obtained from a pre-trained and tested ResNet model to use them as examples.
- ClassActivationMaps.ipynb: this is the script to obtain the Class Activation Maps based on the Grad-CAM technique. You can use the test images we uploaded as example in the folder “TestSet”, they are just one image per class for each projection. You can use them and the pre-trained model in the folder "CC_R_model" to try the script as tutorial a tutorial the first time. Then, you can execute the script on your own larger dataset and on your trained model to obtain the maps in your specific case.
...