...
This cluster is accessible via the LSF batch system for which you can find instructions here [10] and Slurm Workload Manager which will be introduced hereafter. Please keep in mind that the LSF solution is currently in its EOL phase and will be fully substituted by Slurm Workload Manager in the near future.
In the following pages, few details on the account request and first access are given.
...
If a user already has an hpc account, it can skip this paragraph. Otherwise, some preliminary steps occur.
Download and fill in the access authorization form. If help is needed, please contact us at hpc-support@lists.cnaf.infn.it.
Send the form via mail to sysop@cnaf.infn.it and to user-support@lists.cnaf.infn.it
Once the account creation is completed, you will receive a confirmation email at the specified address. In that occasion, you will receive the credentials you need to access the cluster as well, i.e. username and temporary password.
...
First of all, it is necessary SSH into bastion.cnaf.infn.it with the own credentials.
Thereafter, access the HPC cluster logging into ui-hpc.cr.cnaf.infn.it from bastion. You have to use the same credentials you just used to log into bastion.
Your home directory will be: /home/HPC/<your_username>. The home folder is shared among all the cluster nodes.
No quotas are currently enforced on the home directories and about only 4TB are available in the /home partition. In case you need more disk space for data and checkpointing, every user can access the following directory:
/storage/gpfs_maestro/hpc/user/<your_username>/
which is on a shared gpfs storage. Please, do not leave huge unused files in both home directories and gpfs storage areas. Quotas will be however enforced in the near future.
For support, contact us (hpc-support@lists.cnaf.infn.it).
...
Slurm workload manager relies on the following scheme:
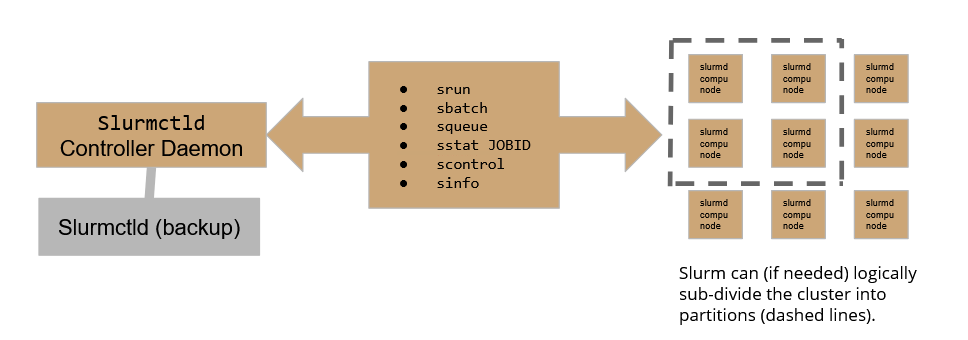
Where the Slurmctld daemon plays the role of the controller, allowing the user to submit and follow the execution of a job, while Slurmd daemons are the active part in the execution of jobs over the cluster. To assure high availability, A backup controller daemon has been configured to assure the continuity of service.
On our HPC cluster, there are currently 4 active partitions:
- slurmHPC_int MaxTime allowed for computation = 79h
- slurmHPC_inf MaxTime allowed for computation = 79h
- slurmHPC_short MaxTime allowed for computation = 79h
- slurm_GPU MaxTime allowed for computation = 33h
- slurm_hpc_gpuV100 MaxTime allowed for computation = 33h
Please be aware that exceeding the MaxTime enforced will result in the job being held.
If not requested differently at submit time, jobs will be submitted to the _int partition. Users can choose freely what partition to use by configuring properly the batch submit file (see below).
...
You can check the cluster status using the sinfo -N command which will print a summary table on the standard output.
The table shows 4 columns: NODELIST, NODES, PARTITION and STATE.
- NODELIST shows node names. Multiple occurrences are allowed since a node can belong to more than one partition
- NODES indicates the number of machines available.
- PARTITION which in slurm is a synonym of "queue" indicates to which partition the node belongs. If a partition name comes with an ending asterisk, it means that that partition will be considered the default one to run the job, if not otherwise specified.
- STATE indicates if the node is not running jobs ("idle"), if it is in drain state ("drain") or if it is running some jobs ("allocated").
For instance:
| Code Block |
|---|
-bash-4.2$ sinfo -N
NODELIST       NODES      PARTITION STATE
hpc-200-06-05      1  slurmHPC_int* idle
hpc-200-06-05      1 slurmHPC_short idle
hpc-200-06-05      1   slurmHPC_inf idle
hpc-200-06-05      1      slurm_GPU idle
hpc-200-06-06      1 slurmHPC_short idle
hpc-200-06-06      1  slurmHPC_int* idle
hpc-200-06-06      1   slurmHPC_inf idle
[...] |
...
To work with a batch, the user should build a batch submit file. Slurm accepts batch files that respect the following basic syntax:
| Code Block |
|---|
#!/bin/bash

#

#SBATCH <OPTIONS>

(...)

srun <INSTRUCTION> |
The #SBATCH directive teaches Slurm how to configure the environment for the job at matter, while srun is used to actually execute specific commands. It is worth now getting acquainted of some of the most useful and commonly used options one can leverage in a batch submit file.
In the following, the structure of batch jobs alongside with few basic examples will be discussed.
...
In order to run instructions, a job has to be scheduled on Slurm: the basic srun command allows to execute very simple commands, such as one-liners on compute nodes.
The srun command can be also enriched with several useful options:
- N<int> allows to run the command on <int> nodes, for instance:
srun -N5 /bin/hostnamewill run the hostname command on 5 nodes;
- v option activates verbosity (vvv is max verbosity);
- w option activates manual node selection.
If the user needs to specify the run conditions in detail as well as running more complex jobs, the user must write down a batch submit file.
...
A Slurm batch job can be configured quite extensively, so shedding some light on the most common sbatch options may help us configuring jobs properly.
To have a more complete list of command options you can visit the slurm documentation. [30]
...
In the following we present some advanced SBATCH options. These ones will allow the user to set up constraints and use specific computing hardware peripherals, such as GPUs.
...
In the following, few utilization examples are given in order to practice with these concepts.
...
A user can retrieve information regarding active job queues with the squeue command for a synthetic overview of Slurm job queue status.
...
In case you are running a job, you can have a detailed check on it with the command
sstat -j <jobid>where jobid is an id given to you by Slurm once you submit the job.
...
Down below are listed some frequently used LSF commands and their SLURM equivalents.
Essential commands
...
Job specification
...
-o filename
...
--output= filename or -o filename,
...
Further commands and options are listed at the following link [32].
...
Below some examples of submit files follow to help the user get comfortable with Slurm.
See them as a controlled playground to test some of the features of Slurm.
...
| Code Block |
|---|
#!/bin/bash
#
#SBATCH --job-name=tasks1
#SBATCH --output=tasks1.txt
#SBATCH --nodelist=hpc-200-06-[17-18]
#SBATCH --ntasks-per-node=8
#SBATCH --time=5:00
#SBATCH --mem-per-cpu=100

srun hostname -s |
To execute this script, the command to be issued is
...
| Code Block |
|---|
bash-4.2$ sbatch test_slurm.sh
Submitted batch job 8501 |
To retrieve the information about the submitted jobs you can use the command "squeue":
| Code Block |
|---|
bash-4.2$ squeue
             JOBID PARTITION     NAME     USER ST       TIME  NODES NODELIST(REASON)
8501 slurmHPC_ test_sl apascoli R 0:01 1 hpc-200-06-05 |
The table shows 8 columns: JOBID, PARTITION, NAME, USER, ST, TIME, NODES and NODELIST(REASON).
- JOBID shows the id corresponding to the submitted jobs.
- PARTITION which in slurm is a synonym of "queue" indicates to which partition the node belongs.
- NAME it corresponds to the name assigned in the submit file, otherwise it will match the name of the submit file.
- USER indicates the user who submitted the job.
- ST indicates if the jobs are running ("R") or if it is pending ("PD").
- TIME shows how long the jobs have run for using the format days-hours:minutes:seconds.
- NODES indicates the number of machines running the job.
- NODELIST indicates where the job is running or the reason it is still pending.
Then, to see information about a single job use:
| Code Block |
|---|
bash-4.2$ sstat --format=JobID,AveCPU -j 8501
JobID            AveCPU
------------ ----------
8501.0 213503982+ |
The option "--format" allows to customise the output based on the desired features.
For instance in the example above are shown:
- JobID
- AveCPU Average (system + user) CPU time of all tasks in job.
Many more features are listed in the slum manual. [31]
The output, from the option --output=tasks1.txt, should be something like (hostnames and formatting may change):
| Code Block |
|---|
-bash-4.2$ cat tasks1.txt
hpc-200-06-17
hpc-200-06-17
hpc-200-06-17
hpc-200-06-17
hpc-200-06-17
[...] |
As we can see, the --ntasks-per-node=8 option was interpreted by slurm as “reserve 8 cpus on node 17 and 8 on node 18 and execute the job on those cpus”.
It is quite useful to see how the output would look in case of --ntasks=8 was used instead of --ntasks-per-cpu. In that case, the output should be exactly:
| Code Block |
|---|
hpc-200-06-17
hpc-200-06-18
hpc-200-06-17
hpc-200-06-18
hpc-200-06-17
hpc-200-06-18
hpc-200-06-17
hpc-200-06-18 |
As we can see the execution involved 8 CPUs only and the payload was organized to minimize the burden over the nodes.
...
To submit an MPI job on the cluster, the user must secure-copy the .mpi executable over the cluster.
In the following example, we prepared a C script that calculates the value of pi and we compiled it with:
| Code Block |
|---|
module load mpi/openmpi-x86_64
mpicc example.c -o picalc.mpi |
N.B: before compiling the file, you need to load the proper module as shown above. You can find the available modules by running module avail. Finally, it is possible to see the list of the loaded modules with:
| Code Block |
|---|
-bash-4.2$ module list
Currently Loaded Modulefiles:
1) mpi/openmpi-x86_64 |
Here's an example of a submit file:
| Code Block |
|---|
#!/bin/bash
#
#SBATCH --job-name=test_mpi_picalc
#SBATCH --output=res_picalc.txt
#SBATCH --nodelist=... #or use --nodes=...
#SBATCH --ntasks=8
#SBATCH --time=5:00
#SBATCH --mem-per-cpu=1000

srun picalc.mpi |
If the .mpi file is not available on desired compute nodes, which will be the most frequent scenario if you save your files in a custom path, computation is going to fail. That happens because Slurm does not take autonomously the responsibility of transferring files over compute nodes.
On way of acting might be to secure copy the executable over the desired nodelist, which can be feasible only if 1-2 nodes are involved. Otherwise, Slurm offers a srun option which may help the user.
In this case, the srun command has to be built as follows:
| Code Block |
|---|
srun --bcast=~/picalc.mpi picalc.mpi |
Where the --bcast option copies the executable to every node by specifying the destination path. In this case, we decided to copy the executable into the home folder keeping the original name as-is.
...
The submission of a python job over the cluster follows the syntactic rules of previous use-cases. The only significative difference is that we have to specify the compiler/interpreter when we call the srun command.
In the following, we show how to execute a python job over 16 CPUs of a selected cluster node.
| Code Block |
|---|
#!/bin/bash
#
#SBATCH --job-name=prova_python_sub
#SBATCH --output=prova_python_sub.txt
#SBATCH --nodelist=hpc-200-06-05
#SBATCH --ntasks=16
#SBATCH --time=5:00
#SBATCH --mem-per-cpu=100

srun python3 trial.py |
Again, if secure-copying the executable over every node involved in our computation is an un-optimized operation, the user should add the --bcast option to the srun command.
...
With Slurm, we can also submit python jobs that leverage a virtual environment. This comes handy if the job needs to use packages that are not included in the standard python setup on the cluster.
In order to do so, the user has to:
- Create a virtual environment in Python
- Activate the environment
- Install the packages that the job needs
- Deactivate the environment
These 4 steps are required only once.
Henceforth, the user can add these lines to the submission script and use the desired virtual environment:
| Code Block |
|---|
source PATH_TO_VENV
srun python myscript.py
deactivate |
...
Complete overview of hardware specs per node:http://wiki.infn.it/strutture/cnaf/clusterhpc/home.
Ask for support via E-mail: hpc-support@lists.cnaf.infn.it.