If your use case has needs related to parallel computing, i.e. multinode-MPI or needs special computing resources such as Intel Manycore or NVIDIA GPUs, probably you need to access the CNAF HPC cluster, which is a small cluster (about 100TFLOPS) but with special HW available [9]. The user needs a different account, in the HPC group, to access the HPC resources. This cluster is accessible via the LSF batch system for which you can find the instruction here [10] and Slurm Workload Manager which will be introduced hereafter. Please, contact User Support (user-support<at>lists.cnaf.infn.it) if interested.
- Access
Access the cluster logging into: ui-hpc.cr.cnaf.infn.it from bastion. You have to use the same credentials you used to log into bastion.
Your home directory will be: /home/HPC/<your_username> and is shared among all the cluster nodes.
No quotas are currently enforced on the home directories and about only 4TB are available in the /home partition. In the case you need more disk space for data and checkpointing every user can access the following directory: /storage/gpfs_maestro/hpc/user/<your_username>/ which is on a shared gpfs storage.
Please, do not leave huge unused files in both home directories and gpfs storage areas. Quotas will be enforced in the near future.
for support, contact us (hpc-support@lists.cnaf.infn.it).
- SLURM architecture
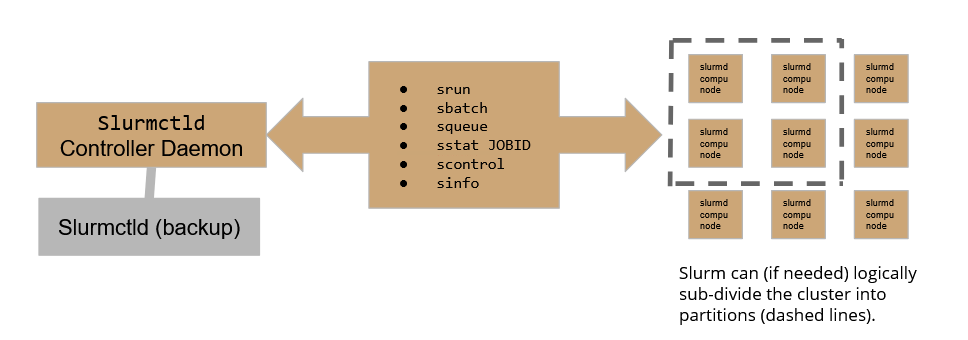
On our HPC cluster, the user can leverage two queues:
<slurmprova> should be used for CPU-exclusive jobs (i.e. jobs that do not use GPU)
<slurmprovaGPU> should be used for CPU+GPU jobs.
- Check the cluster status with SLURM
you can check the cluster status in two ways:
- using the sinfo -N -l command you can list nodes and few properties such as status and hardware capabilities
- using the scontrol show nodes command you can obtain a detailed “per node” list
- Retrieve job informations
you can retrieve informations regarding active job queues with the squeue command for a synthetic overview of Slurm queues or alternatively you can use the scontrol show jobs command for a detailed view of jobs (both running and completed).
In case you are running a job, you can have a check with sstat -j <jobid>, where jobid is a id given to you by Slurm once you submit the job.
- Submit basic instructions on Slurm
In order to run instructions, a job has to be scheduled on Slurm: the basic srun command allows to execute very simple commands, such as one-liners on compute nodes.
The srun command can be enriched with several useful options:
- N<int> allows to run the command on <int> nodes for instance
srun -N5 /bin/hostname
will run the hostname command on 5 nodes:
- v option activates verbosity (vvv is max verbosity)
- w option activates manual node selection
If the user needs to specify the run conditions in detail as well as running more complex jobs, it is strongly recommended (if not mandatory at all) to write down a batch submit file (see below).
- The structure of a basic batch job
to work with a batch, you should build a batch submit file. Slurm accepts batch files that respect the following basic syntax:
#!/bin/bash
#
#SBATCH <OPTIONS>
(...)
srun <INSTRUCTION>
The #SBATCH directive teaches Slurm how to configure the environment for the job at matter, while srun is used to actually execute specific commands. It is worth now getting aquaintance of the most useful and commonly used options one can leverage in a batch submit file.
- #SBATCH options
A Slurm batch job can be configured quite extensively, so shedding some light on the most common sbatch options may help us configuring jobs properly.
#SBATCH --partition=<DUMMY_NAME>
This instruction allows the user to specify on which queue (partition in Slurm jargon) the batch job must land. The option is case-sensitive.
#SBATCH --job-name=<NAME>
This instruction assigns a “human-friendly” name to the job, making it easier to retrieve.
#SBATCH --output=<FILE>
This instructions allows to redirect any output to a file (dynamically created)
#SBATCH --nodelist=<NODES>
This instruction forces Slurm to use a specific subset of nodes for the batch job. For example: if we have a cluster of five nodes: node[1:5] and we specify --nodelist=node[1-2], our job will only use these two nodes.
#SBATCH --nodes=<INT>
This instructions tells slurm to run over <INT> random nodes belonging to the partition.
N.B. Slurm chooses the best <INT> nodes evaluating current payload, so the choice is not fully random. If we want specific nodes to be used, the correct option is the aforementioned --nodelist
#SBATCH --ntasks=<INT>
This command tells Slurm to use <INT> CPUS to perform the job. The CPU load gets distributed to optimize the efficiency and the computational burden on nodes
#SBATCH --ntasks-per-node=<INT>
This command is quite different from the former one: in this case Slurm forces the adoption of <INT> CPUS per node. Suppose you chose 2 nodes for your computation, writing --ntasks-per-node=4, you will force the job to use 4 CPUS on the first node as well as 4 CPUS on the second one.
#SBATCH --time=<TIME>
This command sets an upper time limit for the job to be considered running. When this limit is exceeded, the job will be automatically held.
#SBATCH --mem=<INT>
This option sets an upper limit for memory usage on every compute node in the cluster. It must be coherent with node hardware capabilities in order to avoid failures
- Advanced batch job configuration
In the following we present some advanced SBATCH options. These ones will allow the user to set up constraints and use specific computing hardware peripherals, such as GPUs.
#SBATCH --constraint=<...>
This command sets up hardware constraints. This allows the user to specify over which hardware the job should land or should leverage. Some examples may be: --constraint=IB (use forcibly Infini-Band nodes) or --constraint=<CPUTYPE> (use forcibly CPUTYPE CPUs)
#SBATCH --gres=<GRES>:<#GRES>
This command allows (if gres are configured) leveraging general computing resources. Typical use-case: GPUs. In that case, the command looks like:
--gres=gpu:<INT> where <INT> is the number of GPUs we want to use.
#SBATCH --mem-per-cpu=<INT>
This command sets a memory limit CPU-wise.
N.B. if one sets this instruction, it is mandatory for it to be the only constraint on --mem in the batch job configuration.
In the following, few utilization examples are given in order to practice with these concepts.
- Examples
In the following, some examples of submit files to help the user get comfortable with Slurm. See them as a controlled playground to test some of the features of Slurm
Simple batch submit
#!/bin/bash
#
#SBATCH --job-name=tasks1
#SBATCH --output=tasks1.txt
#SBATCH --nodelist=hpc-200-06-[17-18]
#SBATCH --ntasks-per-node=8
#SBATCH --time=5:00
#SBATCH --mem-per-cpu=100
srun hostname -s
the output should be something like (hostnames may change):
hpc-200-06-17
hpc-200-06-17
hpc-200-06-17
hpc-200-06-17
hpc-200-06-17
hpc-200-06-17
hpc-200-06-17
hpc-200-06-17
hpc-200-06-18
hpc-200-06-18
hpc-200-06-18
hpc-200-06-18
hpc-200-06-18
hpc-200-06-18
hpc-200-06-18
hpc-200-06-18
As we can see, the --ntasks-per-node=8 was interpreted by slurm as “reserve 8 cpus on node 17 and 8 on node 18 and execute the job on those cpus”:
it is quite useful to see how the output would look in case of --ntasks=8 was used instead of --ntasks-per-cpu. In that case, the output should be something like:
hpc-200-06-17
hpc-200-06-18
hpc-200-06-17
hpc-200-06-18
hpc-200-06-17
hpc-200-06-18
hpc-200-06-17
hpc-200-06-18
As we can see the execution involved 8 CPUs only and the payload was organized to minimize the burden over the nodes.
Simple MPI submit
#!/bin/bash
#
#SBATCH --job-name=test_mpi_picalc
#SBATCH --output=res_picalc.txt
#SBATCH --nodelist=... #or use --nodes=...
#SBATCH --ntasks=8
#SBATCH --time=5:00
#SBATCH --mem-per-cpu=1000
srun picalc.mpi
If the .mpi file is not available on compute nodes, which will be the most frequent scenario, computation is going to fail. That happens because Slurm does not take autonomously the responsibility of transfering files over compute nodes.
On way of acting might be to secure copy the executable over the desired nodelist, which can be feasible only if 1-2 nodes are involved. Otherwise, Slurm offers a srun option which may help the user.
build the srun command as follows:
srun --bcast=~/picalc.mpi picalc.mpi
Where the --bcast option copies the executable to every node by specifying the destination path. The final part of srun (the real instruction) should be then coherent with path you specified with bcast.
- Additional Informations
- complete overview of hardware specs per node: http://wiki.infn.it/strutture/cnaf/clusterhpc/home
- ask for support via E-mail: hpc-support@lists.cnaf.infn.it